Welding barrel hinges
Welding is a valuable skill that can be used to build and repair many different types of metal objects.
One of the most common welding jobs is welding barrel hinges, which are an essential component in creating furniture, gates, and other structures.
They can be found in heavy machinery, bridges, and even household items.
Understanding how to properly weld barrel hinges is essential for any welder who wants to maximize the quality and durability of their projects.
What you need to weld Barrel Hinges?
To weld barrel hinges, you will need the following equipment:
- A welding machine (MIG, TIG, or stick welding can be used).
- Welding wire or rods.
- A welding helmet.
- Welding gloves.
- A grinder (for cleaning and shaping the metal before welding).
- A metal cutting saw (if necessary to cut the hinges to size).
- Proper safety gear (such as goggles and a respirator).
- Barrel hinges to be welded.
- A clamp or vise to hold the hinges in place during welding.
What Metals Are Barrel Hinges Manufactured From?
Barrel hinges are typically manufactured from various metals, such as:
- Steel: Steel is a strong and durable metal that is commonly used for barrel hinges. It is also relatively inexpensive and easy to work with.
- Stainless Steel: Stainless steel is a corrosion-resistant metal that is also commonly used for barrel hinges. It is more expensive than regular steel but offers greater durability in harsh environments.
- Aluminum: Aluminum is a lightweight metal that is often used for barrel hinges in applications where weight is a concern, such as in marine or aerospace applications.
- Brass: Brass is a corrosion-resistant metal that offers a distinctive golden color. It is often used for decorative or ornamental barrel hinges.
- Bronze: Bronze is a corrosion-resistant metal that offers a distinctive red-brown color. It is often used for decorative or ornamental barrel hinges.
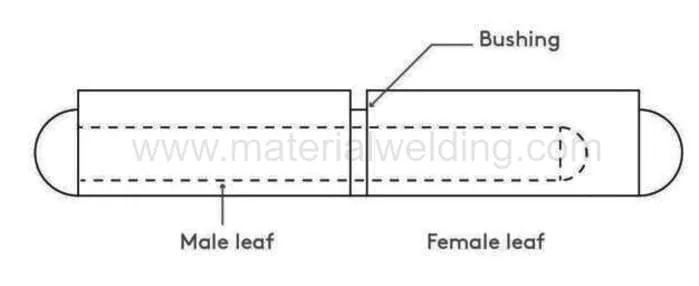
Parts of barrel hinge
Following are the parts of a barrel hinge:

- Bushing: This is a small cylindrical part that is placed inside the hinge to reduce friction and wear on the hinge pin.
- Male leaf: This is one of the two parts of the hinge that attach to the door or gate. It has a protruding pin that fits into the female leaf.
- Female leaf: This is the other part of the hinge that attaches to the frame. It has a hole that the male leaf’s pin fits into, allowing the hinge to rotate.
How To Install & Weld Barrel Hinges?
1. You can either directly weld the barrel on the door/ gate or,

2. You can weld small plates to hinge first and then weld these plates to door/gate.

For welding and installing a barrel hinge, follow these simple steps:
- Measure and mark the location for the hinge on the door or gate or the frame. Using a tape measure and a pencil or chalk, mark the places where the loops will be placed.
- Cut the hinge to the correct size if necessary.
- Clean and prepare the metal surfaces where the hinge will be installed. This includes removing any paint, rust, or debris.
- Place the hinge leaves in the correct position, making sure that the pin aligns with the hole in the female leaf.
- Secure the hinge leaves in place with clamps or a vise.
- Turn on the welding machine and adjust the settings as needed for the type of metal and thickness of the hinge.
- Begin welding (Use 6013 or 7018 rod for mild steel hinges) the hinge leaves together, starting at one end and working your way to the other. Be sure to keep the welds as smooth and even as possible.
- Grind down any excess welds and smooth out the surface of the hinge.

- Inspect the hinge for any defects or issues and make any necessary adjustments.
- Repeat the process on the other hinge leaves.
- Drill the holes for the screws on both leaves and attach the hinge to the door or gate and the frame using screws. Alternatively, you can weld the hinge directly on the door or gate.
- Check the alignment and adjust as necessary, make sure that the door or gate is level and swings smoothly.
Installing bullet hinges
Installing bullet hinges involves the following steps:
- Measure and mark the location for the hinge on the door or gate and the frame.
- Cut the hinge to size if needed.
- Clean and prepare the metal surfaces for installation.
- Place the hinge leaves in position and secure them with clamps or a vise.
- Weld the hinge leaves together, starting at one end and working towards the other.
- Grind down any excess welds and smooth out the surface of the hinge.
- Repeat the process for the other hinge leaves.
- Drill holes for screws and attach the hinge to the door or gate and frame.
- Check alignment and adjust as needed.


